domenica 31 agosto 2008

Daring Bakers come back in France: éclairs au chocolat!


It is three month since I become a DB and that’s the second French recipe we cook…
Being Italian I could be a little bit jealous… but how can I possibly be jealous of the éclairs? I can just be grateful Someone invented them! And I have indeed many faults, but not these: I am a grateful person… so, thanks a lot to the inventor of the recipe and thanks a lot to MeetaK and Tony, to such a delightful choice!!!

As usual, below you can find the recipe, but go straight to the Daring Bakers blogroll, to see the beauties of my fellows DBs!

For me, I decided not to glaze them, even if I did the glaze (mmmh and it was delicious...): they seemed already too sweet to me…

Pierre Hermé’s Chocolate Éclairs
Recipe from Chocolate Desserts by Pierre Hermé (makes 20-24 Éclairs)


• Cream Puff Dough (see below for recipe), fresh and still warm
1) Preheat your oven to 375 degrees F (190 degrees C). Divide the oven into thirds bypositioning the racks in the upper and lower half of the oven. Line two baking sheets withwaxed or parchment paper.
2) Fill a large pastry bag fitted with a 2/3 (2cm) plain tip nozzle with the warm cream puff dough.Pipe the dough onto the baking sheets in long, 4 to 41/2 inches (about 11 cm) chubby fingers.
Leave about 2 inches (5 cm) space in between each dough strip to allow them room to puff. The dough should give you enough to pipe 20-24 éclairs.
3) Slide both the baking sheets into the oven and bake for 7 minutes. After the 7 minutes, slip the handle of a wooden spoon into the door to keep in ajar. When the éclairs have been in the oven for a total of 12 minutes, rotate the sheets top to bottom and front to back. Continue baking for a further 8 minutes or until the éclairs are puffed, golden and firm. The total baking time should be approximately 20 minutes.


Notes:
1) The éclairs can be kept in a cool, dry place for several hours before filling.


Assembling the éclairs:
• Chocolate glaze (see below for recipe)
• Chocolate pastry cream (see below for recipe)
1) Slice the éclairs horizontally, using a serrated knife and a gently sawing motion. Set aside the bottoms and place the tops on a rack over a piece of parchment paper.
2) The glaze should be barely warm to the touch (between 95 – 104 degrees F or 35 – 40 degrees C, as measured on an instant read thermometer). Spread the glaze over the tops ofthe éclairs using a metal icing spatula. Allow the tops to set and in the meantime fill the bottoms with the pastry cream.
3) Pipe or spoon the pastry cream into the bottoms of the éclairs. Make sure you fill the bottoms with enough cream to mound above the pastry. Place the glazed tops onto the pastry cream and wriggle gently to settle them.


Notes:
1) If you have chilled your chocolate glaze, reheat by placing it in a bowl over simmering water, stirring it gently with a wooden spoon. Do not stir too vigorously as you do not want to create bubbles.
2) The éclairs should be served as soon as they have been filled.


Pierre Hermé’s Cream Puff Dough
Recipe from Chocolate Desserts by Pierre Hermé (makes 20-24 Éclairs)
• ½ cup (125g) whole milk
• ½ cup (125g) water
• 1 stick (4 ounces; 115g) unsalted butter, cut into 8 pieces
• ¼ teaspoon sugar
• ¼ teaspoon salt
• 1 cup (140g) all-purpose flour
• 5 large eggs, at room temperature


1) In a heavy bottomed medium saucepan, bring the milk, water, butter, sugar and salt to the boil.
2) Once the mixture is at a rolling boil, add all of the flour at once, reduce the heat to medium and start to stir the mixture vigorously with a wooden spoon. The dough comes together very quickly. Do not worry if a slight crust forms at the bottom of the pan, it’s supposed to. You need to carry on stirring for a further 2-3 minutes to dry the dough. After this time the doughwill be very soft and smooth.
3) Transfer the dough into a bowl of a mixer fitted with the paddle attachment, or using your handmixer or if you still have the energy, continue by hand. Add the eggs one at a time, beating after each egg has been added to incorporate it into the dough. You will notice that after you have added the first egg, the dough will separate, once again do not worry. As you keep working the dough, it will come back all together again by the time you have added the third egg. In the end the dough should be thick and shiny and when lifted itshould fall back into the bowl in a ribbon.
4) The dough should be still warm. It is now ready to be used for the éclairs as directed above.


Notes:
1) Once the dough is made you need to shape it immediately.
2) You can pipe the dough and the freeze it. Simply pipe the dough onto parchment-lined baking sheets and slide the sheets into the freezer. Once the dough is completely frozen, transfer the piped shapes into freezer bags. They can be kept in the freezer for up to a month.


Chocolate Pastry Cream Recipe from Chocolate Desserts by Pierre Hermé
• 2 cups (500g) whole milk
• 4 large egg yolks
• 6 tbsp (75g) sugar
• 3 tablespoons cornstarch, sifted
• 7 oz (200g) bittersweet chocolate, preferably Velrhona Guanaja, melted
• 2½ tbsp (1¼ oz: 40g) unsalted butter, at room temperature


1) In a small saucepan, bring the milk to a boil. In the meantime, combine the yolks, sugar and cornstarch together and whisk in a heavy-bottomed saucepan.
2) Once the milk has reached a boil, temper the yolks by whisking a couple spoonfuls of the hot milk into the yolk mixture. Continue whisking and slowly pour the rest of the milk into the tempered yolk mixture.
3) Strain the mixture back into the saucepan to remove any egg that may have scrambled. Place the pan over medium heat and whisk vigorously (without stop) until the mixture returns to a boil. Keep whisking vigorously for 1 to 2 more minutes (still over medium heat).
Stir in the melted chocolate and then remove the pan from the heat.
4) Scrape the pastry cream into a small bowl and set it in an ice-water bath to stop the cooking process. Make sure to continue stirring the mixture at this point so that it remains smooth.
5) Once the cream has reached a temperature of 140 F (ca 60°C) remove from the ice-water bath and stir in the butter in three or four installments. Return the cream to the ice-water bath to continue cooling, stirring occasionally, until it has completely cooled. The cream is now ready to use or store in the fridge.


Notes:
1) The pastry cream can be made 2-3 days in advance and stored in the refrigerator.
2) In order to avoid a skin forming on the pastry cream, cover with plastic wrap pressed onto the cream.
3) Tempering the eggs raises the temperature of the eggs slowly so that they do not scramble.


Chocolate Glaze Recipe from Chocolate Desserts by Pierre Hermé (makes 1 cup or 300g)
• 1/3 cup (80g) heavy cream
• 3½ oz (100g) bittersweet chocolate, finely chopped
• 4 tsp (20 g) unsalted butter, cut into 4 pieces, at room temperature
• 7 tbsp (110 g) Chocolate Sauce (recipe below), warm or at room temperature


1)In a small saucepan, bring the heavy cream to a boil. Remove from the heat and slowly begin to add the chocolate, stirring with a wooden spoon or spatula.
2) Stirring gently, stir in the butter, piece by piece followed by the chocolate sauce.


Notes:
1) If the chocolate glaze is too cool (i.e. not liquid enough) you may heat it briefly in the microwave or over a double boiler. A double boiler is basically a bowl sitting over (not touching) simmering water.
2) It is best to glaze the eclairs after the glaze is made, but if you are pressed for time, you can make the glaze a couple days ahead of time, store it in the fridge and bring it up to the proper temperature (95 to 104 F) when ready to glaze.

Chocolate SauceRecipe from Chocolate Desserts by Pierre Hermé (makes 1½ cups or 525 g)

• 4½ oz (130 g) bittersweet chocolate, finely chopped

• 1 cup (250 g) water

• ½ cup (125 g) crème fraîche, or heavy cream

• 1/3 cup (70 g) sugar

1) Place all the ingredients into a heavy-bottomed saucepan and bring to a boil, making sure to stir constantly. Then reduce the heat to low and continue stirring with a wooden spoon until the sauce thickens.
2) It may take 10-15 minutes for the sauce to thicken, but you will know when it is done when it coats the back of your spoon.

mercoledì 27 agosto 2008

Bargello: Proviamolo - Give it a try!

Pioggia Tropicale - Tropical Rain


Questo è il lavoro che ho fatto per la Riffa d'Estate di Patchwork Caffé (lo so, sono un po' in ritardo, la riffa era a giugno...). L'ho tratta dal libro Bargello Quilts di Margie Edie: non sarà la tecnica che mi cambierà la vita, ma è stato comunque molto interessante provarla, anche perchè non avevo mai provato a quiltare mentre cucivo ed è una tecnica con risvolti interessanti...
Questa tovaglietta è finita nelle attente mani di Francesca, che l'ha molto apprezzata (grazie Fra!). Per uno scherzo del destino, a me è arrivato il suo lavoro!!! Una bellissima tovaglietta con un tema molto molto estivo che vi farò vedere non appena riesco a mettere ordine nel mio archivio fotografico!!! State sintonizzati, merita davvero!

(Poor) ENGLISH, please:

This is the result of the Summer Raffle of the Patchwork Caffé forum (I know, I know, it's a bit late: the raffle was in june...)! A bargello- style table mat from the book Bargello Quilts of Margie Edie. It is not the method-of-my-life, but it is well worth a try, because of the particular effects you can achieve! Besides, I've never tried the quilt-as-you-go technique and I found it very interesting...
By the way, my friend Francesca won this table mat and liked it, too (that wasn't obvious!), so I'm pretty happy with my work! For a strange coincidence, I won Fra's work! Next time I will show you: stay tuned, it's well worth!

domenica 24 agosto 2008

Frutta Party: la salute innanzitutto!

ApfelKanten


Ho trovato questa ricettina sul sito di Vegan3000, dove ovviamente le ricette sono "vegan", cioè senza carne, pesce, latticini, uova... Avevo a cena un'amica vegetariana con in più delle intolleranze (glutine e latticini), ma non volevo rinunciare a qualcosa di dolce, così ho deciso di provare questa sorta di budino di mele...
La propongo per il Frutta Party di Cindystar, non all'altezza con le sue meraviglie!
La ricetta è sul sito, ve la riporto per comodità:

Ingredienti:
1/2 litro di succo di mela, 1 pizzico di sale, 1 cucchiaino di agar agar, 1 mela, 1 manciata di uvetta.

Mettere la manciata di uvetta a mollo in un pochino di succo di mele. Lavare accuratamente la mela e tagliarla a triangolini molto piccoli. Scaldare il succo di mela in una pentola, aggiungendoci un pizzico di sale, per esaltare il gusto dolce, ed un cucchiaino raso di agar agar in polvere (l'agar agar è un addensante ricavato da un'alga, che raffreddando diventa gelatinoso, ovviamente non è un derivato animale come le gelatine che si trovano di solito e si può trovare nei negozi di alimentazione naturale). Mescolare accuratamente fino al bollore. A questo punto aggiungere nella pentola di cottura la mela tagliata precedentemente a triangolini e metà dell'uvetta ammollata nel succo di mele. Mescolare, versare nelle coppette e lasciar raffreddare.
Più sano di così!!!
Buon appetito!


(Poor) ENGLISH, please...

I found this recipe in the Vegan3000-site, a vegan-style site with many interesting recipes (in Italian language). I have a very close friend, who is vegetarian AND she doesn't eat gluten and dairy products, so a dinner with her is a real cooking challenge!
This time I tried this recipe for dessert:

APFELKANTEN

Ingredients:
2 cups apple juice, a pinch of salt, 1 teaspoon agar-agar (a vegetable gelatin, you can find it in Natural Food shops), 1 apple, 1/4 cup currant


Put the raisins in a little applejuice and set aside. Wash accurately the apple and cut it in very little pieces.
Mix well in a saucepan the apple juice with salt and agar-agar powder and bring to a boil. Add the apple and the currants (drained from the juice).
Mix well and let it cool at room temperature, then put in the fridge to set (about 1 1/2 hour).
Good and healthy!!!
Bon Appètit!

martedì 12 agosto 2008

Harmony in the Chaos: si comincia!!!


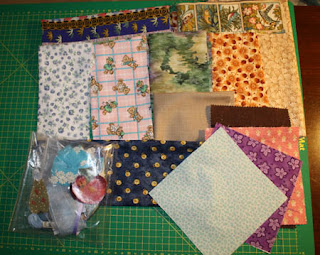
Ecco cosa c'era nella busta che la cara Floriana mi ha inviato per l'Harmony in the chaos di Patchwork Caffé!

Un sacco di stoffine bellissime e fili e bottoni e perline e nastri... mammamia!!!!

Ho già qualche mezza idea... speriamo di riuscire a concretizzarla in maniera decorosa!

Ragazzi, si parte!!! E pensare che non è ancora metà agosto e sono già piena di cose da fare!!!

sabato 2 agosto 2008

Danish Braid: Lost in Translation


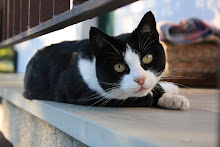
La foto non c'entra niente... nemmeno con la Danimarca, visto che risale ad una splendida vacanza bici&barca in Olanda, ma mi piaceva tanto... mi scuso con i danesi: quando riuscirò a visitare il loro bellissimo Paese rimedierò...

Alessandra prima e Giulia poi mi hanno chiesto la traduzione della ricetta della Danish braid, fatta per il Daring Bakers di giugno. Eccole accontentate... spero di non aver fatto pasticci con la traduzione (sono tutt'altro che un'esperta!). Invece per le foto le rimando al post originale, invitando comunque tutti a visitare il blogroll dei Daring Bakers, per vedere le cose meravigliose fatte dagli altri partecipanti!


TRECCIA DANESE

PER l’IMPASTO (DETREMPE)
1 cubetto di lievito di birra (25 g)
125 ml di latte intero
65 g di zucchero
La buccia grattugiata di 1 arancia
¾ di cucchiaino di cardamomo in polvere (facoltativo, io non l'ho messo)
1 e ½ cucchiaino di estratto di vaniglia
I semi di ½ bacca di vaniglia
2 uova grandi
¼ di tazza di succo d’arancia
325 g di farina
1 cucchiaino di sale

PER IL BLOCCO DI BURRO (BEURRAGE)
225 g di burro freddo
25 g di farina

IMPASTO
Mescola lievito e latte nel boccale di un mixer con la frusta a velocità media. Lentamente aggiungi zucchero, la buccia d’arancia, l’estratto di vaniglia, i semi di vaniglia, le uova, il succo d’arancia ed il cardamomo (se lo usi). Mescola bene; cambia la frusta con un gancio per impastare e aggiungi la farina mescolata col sale, 1 tazza alla volta, aumentando la velocità da bassa a media.
Mescola per circa 5 minuti, o comunque finché l’impasto è senza grumi. Potresti dover aggiungere dell’altra farina, se fosse troppo appiccicoso.
Trasferisci la pasta in frigo, coperta con della plastica trasparente, e lascia riposare per 30 minuti.

BEURRAGE
Mescola burro e farina nel mixer e batti a media velocità per circa 1 minuto. Ripulisci le pareti del boccale e fai andare ancora per 1 minuto, o finché sarà senza grumi. Metti da parte a temperatura ambiente.

1. Dopo i 30 minuti, tira fuori l’impasto dal frigo e stendilo su una superficie leggermente infarinata fino ad avere un rettangolo di circa 45x33 cm, spesso mezzo cm abbondante.
Spargi il burro omogeneamente al centro e sul terzo alla tua destra dell’impasto; piega la parte alla tua sinistra verso il centro, coprendo metà del burro e poi prendi il terzo a destra e ripiegalo pure lui verso il centro. Questo è il primo giro.
Non dimenticare assolutamente come è posizionato l’impasto (eventualmente fai una fossetta in basso a sinistra, per ricordarti).
Metti l’impasto in frigo per 30 minuti, coperto da un foglio di plastica.

2. Tira fuori l’impasto e stendilo su una superficie infarinata, fagli fare ¼ di giro in modo che adesso i lati aperti siano alla tua destra e sinistra. Stendi la pasta ancora in un rettangolo da 45x33 cm, stesso spessore e richiudilo a libro come fatto sopra. Questo è il secondo giro. Rimetti in frigo, sempre coperto, per altri 30 minuti.
(la cosa comincerà a essere complicata, per via del burro che vuole scappare, se riuscite a tenderlo dentro la sfogliatura, ovviamente, ne guadagna, per non parlare del fatto che non dovete ripulire il piano di lavoro ogni 3x2!!!)

3. Ripeti la stessa operazione per altre 2 volte (4 giri totali). Mi raccomando ricordati il verso dei giri!

4. Dopo l’ultimo giro l’impasto va tenuto in frigo per almeno 5 ore (meglio se lo prepari il giorno prima e lo fai riposare tutta la notte). A questo punto l’impasto è pronto: si conserva in frigo per 24 ore, oppure in freezer fino ad 1 mese (falla scongelare rimettendola alcune ore in frigo, in modo che scongeli lentamente).

RIPIENO ALLE MELE
4 mele (ottime le fuji), sbucciate e tagliate a pezzettini
95 g di zucchero
Cannella in polvere
Semi di mezza stecca di vaniglia
¼ di tazza di succo di limone
4 cucchiai di burro.

Metti tutti gli ingredienti (la cannella è a piacere, la ricetta originale parla di 1/4 di cucchiaino), tranne il burro, in una ciotola e mescola bene.
Fai sciogliere il burro in una pentola, poi aggiungi l’impasto di mele e fai cuocere finché non saranno morbide e caramellate (10-15 minuti). Lascia raffreddare completamente prima di riempire la treccia.

A questo punto possiamo comporre la nostra treccia:
1. Stendi l’impasto in un rettangolo (io l’ho diviso in 4, perché era tanto e non mi sarebbe stato in forno, nemmeno diviso in 2!) e fai dei tagli obliqui paralleli sul lato lungo, in modo che però rimanga un terzo di impasto intero al centro. Su questo terzo centrale metti il ripieno (alle mele, alle ciliegie, ai fichi, ma è spettacolare anche la nutella!!!). Poi incrocia le fasce tagliate, prima una di sinistra e poi una di destra e avanti così (dalla foto si capisce meglio come dev’essere l’effetto finale).
2. un uovo sbattuto spennellato sull’impasto darà una finitura dorata molto accattivante alla treccia cotta!
3. Fai lievitare la treccia a temperatura ambiente (90 F) per un paio d’ore, coperta con un foglio di plastica unto d’olio o di burro (se usi l’olio, non l’extravergine, è troppo saporito!), finché non sarà raddoppiata di volume.
4. Circa 20 minuti prima che finisca di lievitare, accendi il forno a 200°C.
5. Fai cuocere la vostra treccia in forno caldo per 10 minuti, poi abbassa la temperatura a 180°C, gira la treccia (in modo che la parte che era verso il dietro del fondo ora sia davanti) e fai cuocere ancora 15-20 minuti, finché non sarà dorata.
6. Falla raffreddare un pochino e servila tiepida o a temperatura ambiente.
7. La treccia si conserva 2 giorni in frigorifero o fino ad 1 mese in freezer.
Buon Appetito!!!

venerdì 1 agosto 2008

Un'estate al mare...


... noi non amiamo la vita da spiaggia, mio marito ed io...

Si da il caso, però, che invece la creatura sedicenne la adori... praticamente a Lignano c'era la trasferta di tutti i suoi amici/compagni di classe/centro estivo/etc/etc/etc...
E così abbiamo deciso di fare questo tentativo...
E' stato molto riposante, ma preferisco ancora le mie "vecchie" vacanze...
Comunque, eccomi tornata a casa...